[TOC]
Quartz 是什么
Quartz 是一款 Java 编写的开源任务调度框架,同时它也是 Spring 默认的任务调度框架。它的作用其实类似于 Java 中的 Timer 定时器以及JUC中的 ScheduledExecutorService 调度线程池,当然 Quartz 作为一个独立的任务调度框架无疑在这方面表现的更为出色,功能更强大,能够定义更为复杂的执行规则
Quartz 中主要用到了:Builder 建造者模式、Factory 工厂模式以及组件模式
- 任务(Job,需要将具体的业务逻辑写到实现了 Job 接口的实现类中)
- 触发器(Trigger,它定义了任务的执行规则)
- 调度器(Scheduler,通过传入的任务Job和触发器Trigger,以指定的规则执行任务)
maven 依赖包
1
2
3
4
5
<dependency>
    <groupId>org.quartz-scheduler</groupId>
    <artifactId>quartz</artifactId>
    <version>2.3.2</version>
</dependency>
Quartz 使用的是 slf4j 日志,但是没有具体的实现;为了更直观的看到任务的执行时间,这里导入 Logback 的日志实现,在 pom 文件中新增依赖:
1
2
3
4
5
<dependency>
    <groupId>ch.qos.logback</groupId>
    <artifactId>logback-classic</artifactId>
    <version>1.2.3</version>
</dependency>
默认的日志格式不是很好,在 maven 项目中的 resources 目录下直接放置一个名为 logback.xml 的文件,这里只要配置控制台的输出即可:
1
2
3
4
5
6
7
8
9
10
11
12
13
14
15
16
17
18
19
20
21
22
23
24
<?xml version="1.0" encoding="UTF-8"?>
<configuration scan="true" scanPeriod="60 seconds" debug="false" >
    <!-- 日志级别 -->
    <property name="logLevel" value="INFO"/>

    <!-- 异步缓冲队列的深度,该值会影响性能.默认值为256 -->
    <property name="queueSize" value="512" />

    <!-- LOGGER  PATTERN  配置化输出格式 -->
    <property name="logPattern" value="%d{yyyy-MM-dd HH:mm:ss} [%-5level] %logger - %msg%n"/>

    <!-- 控制台打印日志的相关配置 -->
    <appender name="STDOUT" class="ch.qos.logback.core.ConsoleAppender">
        <!-- 日志格式 -->
        <encoder>
            <charset>UTF-8</charset>
            <pattern>${logPattern}</pattern>
        </encoder>
    </appender>

    <root level="${logLevel}">
        <appender-ref ref="STDOUT" />
    </root>
</configuration>
Job 任务接口
Job 任务接口是具体任务的执行入口,也就是业务逻辑代码,类似 TimerTask 的 run 方法
package org.quartz 包下 Job 接口,只有一个方法
1
2
3
4
5
public interface Job {

    void execute(JobExecutionContext context) throws JobExecutionException;

}
创建一个任务实现该接口
1
2
3
4
5
6
7
8
9
10
11
12
13
14

// 部分注释

/**
* Instances of <code>Job</code> must have a <code>public</code>
* no-argument constructor.
*/
public class QuartzJobImpl implements Job {

    @Override
    public void execute(JobExecutionContext context) throws JobExecutionException {
        // 业务逻辑代码
    }
}
通过官方注释中提到的,实现 Job 接口的类必须要有一个无参构造器,这是因为 Quartz 是通过反射机制实例化任务类的
但是 Job 并不能直接被调度器使用,它需要通过 JobDetail 绑定后传递给 Scheduler
一个 Job 可以对应多个 Trigger 触发器,每当调度器要执行J ob 的 execute 方法前,会创建一个 Job 实例,而当调用完成后,该实例会被垃圾收集器回收
JobDetail 任务接口
package org.quartz 包下 JobDetail 接口
1
2
3
4
5
6
7
8
9
10
11
12
13
14
15
16
17
18
19
20
21
22
23
24
25
26
27
28
29
30
31
32
33
34
35
36
37
38
39
40
41
42
43
44
45
46
47
48
49
50
51
52
53
54
55
56
57
public interface JobDetail extends Serializable, Cloneable {

    public JobKey getKey();

    public String getDescription();

    public Class<? extends Job> getJobClass();

    public JobDataMap getJobDataMap();

    /**
     * <p>
     * Whether or not the <code>Job</code> should remain stored after it is
     * orphaned (no <code>{@link Trigger}s</code> point to it).
     * </p>
     *
     * <p>
     * If not explicitly set, the default value is <code>false</code>.
     * </p>
     *
     * @return <code>true</code> if the Job should remain persisted after
     *         being orphaned.
     */
    public boolean isDurable();

    /**
     * @see PersistJobDataAfterExecution
     * @return whether the associated Job class carries the {@link PersistJobDataAfterExecution} annotation.
     */
    public boolean isPersistJobDataAfterExecution();

    /**
     * @see DisallowConcurrentExecution
     * @return whether the associated Job class carries the {@link DisallowConcurrentExecution} annotation.
     */
    public boolean isConcurrentExectionDisallowed();

    /**
     * <p>
     * Instructs the <code>Scheduler</code> whether or not the <code>Job</code>
     * should be re-executed if a 'recovery' or 'fail-over' situation is
     * encountered.
     * </p>
     *
     * <p>
     * If not explicitly set, the default value is <code>false</code>.
     * </p>
     *
     * @see JobExecutionContext#isRecovering()
     */
    public boolean requestsRecovery();

    public Object clone();

    public JobBuilder getJobBuilder();

}
isDurable、isPersistJobDataAfterExecution、isConcurrentExectionDisallowed、requestsRecovery 方法对应的属性设置可通过 JobBuilder 设置
isDurable():
任务是否是可持续的,如果一个任务不是可持续的,则当没有触发器关联它的时候,Quartz 会从 scheduler 中删除它
isPersistJobDataAfterExecution():
是否在任务执行后持久化 Job 数据,true 持久化,false 不做操作;可通过在 Job 实现类上标注 @PersistJobDataAfterExecution 注解设置
isConcurrentExectionDisallowed():
是否禁止并发运行,如果该属性为 true,表示任务不是并发运行的,可通过在 Job 实现类上标注 @DisallowConcurrentExecution 注解设置
requestsRecovery():
是否能请求恢复,如果一个任务请求恢复,一般是该任务执行期间发生了系统崩溃或者其他关闭进程的操作,当服务再次启动的时候,会再次执行该任务。这种情况下 JobExecutionContext.isRecovering() 会返回 true
Scheduler 调度器需要借助 JobDetail 对象来添加 Job 实例 , JobDetail 接口的实例要通过 JobBuilder 类构建( Builder 建造者模式)
1
2
3
// 构建一个JobDetail实例,通过newJob方法绑定QuartzJob类,之后指定Job的名称和组名,但这不是必须的
    JobDetail jobDetail = JobBuilder.newJob(QuartzJob.class)
            .withIdentity("job1", "group1").build();
JobExecutionContext 任务上下文接口
回顾下 Job 接口的 execute 方法参数 JobExecutionContext
1
void execute(JobExecutionContext context) throws JobExecutionException;
package org.quartz 包下 JobExecutionContext 接口
1
2
3
4
5
6
7
8
9
10
11
12
13
14
15
16
17
18
19
20
21
22
23
24
25
26
27
28
29
30
31
32
33
34
35
36
37
38
39
40
41
42
43
44
45
46
47
48
49
50
51
52
53
54
55
56
57
58
59
60
61
62
63
64
65
66
67
68
69
70
71
72
73
74
75
76
77
78
79
80
81
82
83
84
85
86
87
88
89
90
91
92
93
94
95
96
97
98
99
100
101
102
103
104
105
106
107
108
109
110
111
112
113
114
115
116
117
118
119
120
121
122
123
124
125
126
127
128
129
130
131
132
133
134
135
136
137
138
139
140
141
142
143
144
145
146
147
148
149
150
151
152
153
154
155
156
157
158
159
160
161
162
163
164
165
166
167
168
169
170
171
172
173
174
175
176
177
178
179
180
181
182
183
184
185
186
187
188
189
190
191
192
public interface JobExecutionContext {

    /**
     * <p>
     * Get a handle to the <code>Scheduler</code> instance that fired the
     * <code>Job</code>.
     * </p>
     */
    public Scheduler getScheduler();

    /**
     * <p>
     * Get a handle to the <code>Trigger</code> instance that fired the
     * <code>Job</code>.
     * </p>
     */
    public Trigger getTrigger();

    /**
     * <p>
     * Get a handle to the <code>Calendar</code> referenced by the <code>Trigger</code>
     * instance that fired the <code>Job</code>.
     * </p>
     */
    public Calendar getCalendar();

    /**
     * <p>
     * If the <code>Job</code> is being re-executed because of a 'recovery'
     * situation, this method will return <code>true</code>.
     * </p>
     */
    public boolean isRecovering();

    /**
     * Return the {@code TriggerKey} of the originally scheduled and now recovering job.
     * <p>
     * When recovering a previously failed job execution this method returns the identity
     * of the originally firing trigger.  This recovering job will have been scheduled for
     * the same firing time as the original job, and so is available via the
     * {@link #getScheduledFireTime()} method.  The original firing time of the job can be
     * accessed via the {@link Scheduler#FAILED_JOB_ORIGINAL_TRIGGER_FIRETIME_IN_MILLISECONDS}
     * element of this job's {@code JobDataMap}.
     *
     * @return the recovering trigger details
     * @throws IllegalStateException if this is not a recovering job.
     */
    public TriggerKey getRecoveringTriggerKey() throws IllegalStateException;

    public int getRefireCount();

    /**
     * <p>
     * Get the convenience <code>JobDataMap</code> of this execution context.
     * </p>
     *
     * <p>
     * The <code>JobDataMap</code> found on this object serves as a convenience -
     * it is a merge of the <code>JobDataMap</code> found on the
     * <code>JobDetail</code> and the one found on the <code>Trigger</code>, with
     * the value in the latter overriding any same-named values in the former.
     * <i>It is thus considered a 'best practice' that the execute code of a Job
     * retrieve data from the JobDataMap found on this object.</i>
     * </p>
     *
     * <p>NOTE: Do not expect value 'set' into this JobDataMap to somehow be set
     * or persisted back onto a job's own JobDataMap - even if it has the
     * <code>@PersistJobDataAfterExecution</code> annotation.
     * </p>
     *
     * <p>
     * Attempts to change the contents of this map typically result in an
     * <code>IllegalStateException</code>.
     * </p>
     *
     */
    public JobDataMap getMergedJobDataMap();

    /**
     * <p>
     * Get the <code>JobDetail</code> associated with the <code>Job</code>.
     * </p>
     */
    public JobDetail getJobDetail();

    /**
     * <p>
     * Get the instance of the <code>Job</code> that was created for this
     * execution.
     * </p>
     *
     * <p>
     * Note: The Job instance is not available through remote scheduler
     * interfaces.
     * </p>
     */
    public Job getJobInstance();

    /**
     * The actual time the trigger fired. For instance the scheduled time may
     * have been 10:00:00 but the actual fire time may have been 10:00:03 if
     * the scheduler was too busy.
     *
     * @return Returns the fireTime.
     * @see #getScheduledFireTime()
     */
    public Date getFireTime();

    /**
     * The scheduled time the trigger fired for. For instance the scheduled
     * time may have been 10:00:00 but the actual fire time may have been
     * 10:00:03 if the scheduler was too busy.
     *
     * @return Returns the scheduledFireTime.
     * @see #getFireTime()
     */
    public Date getScheduledFireTime();

    public Date getPreviousFireTime();

    public Date getNextFireTime();

    /**
     * Get the unique Id that identifies this particular firing instance of the
     * trigger that triggered this job execution.  It is unique to this
     * JobExecutionContext instance as well.
     *
     * @return the unique fire instance id
     * @see Scheduler#interrupt(String)
     */
    public String getFireInstanceId();

    /**
     * Returns the result (if any) that the <code>Job</code> set before its
     * execution completed (the type of object set as the result is entirely up
     * to the particular job).
     *
     * <p>
     * The result itself is meaningless to Quartz, but may be informative
     * to <code>{@link JobListener}s</code> or
     * <code>{@link TriggerListener}s</code> that are watching the job's
     * execution.
     * </p>
     *
     * @return Returns the result.
     */
    public Object getResult();

    /**
     * Set the result (if any) of the <code>Job</code>'s execution (the type of
     * object set as the result is entirely up to the particular job).
     *
     * <p>
     * The result itself is meaningless to Quartz, but may be informative
     * to <code>{@link JobListener}s</code> or
     * <code>{@link TriggerListener}s</code> that are watching the job's
     * execution.
     * </p>
     */
    public void setResult(Object result);

    /**
     * The amount of time the job ran for (in milliseconds).  The returned
     * value will be -1 until the job has actually completed (or thrown an
     * exception), and is therefore generally only useful to
     * <code>JobListener</code>s and <code>TriggerListener</code>s.
     *
     * @return Returns the jobRunTime.
     */
    public long getJobRunTime();

    /**
     * Put the specified value into the context's data map with the given key.
     * Possibly useful for sharing data between listeners and jobs.
     *
     * <p>NOTE: this data is volatile - it is lost after the job execution
     * completes, and all TriggerListeners and JobListeners have been
     * notified.</p>
     *
     * @param key the key for the associated value
     * @param value the value to store
     */
    public void put(Object key, Object value);

    /**
     * Get the value with the given key from the context's data map.
     *
     * @param key the key for the desired value
     */
    public Object get(Object key);

}
当 sheduler 调用一个 Job 时,就会将 JobExecutionContext 传递给 Job 的 execute 方法,Job 对象里能通过 JobExecutionContext 对象访问到 Quartz 运行时的环境和Job本身的一些信息如 Scheduler、Trigger、Calendar 以及 JobDetail 等等一些相关的对象信息
还有一个很重要的类型 JobDataMap ,它可以以 Map(键值对)的形式传递我们的一些需要的信息(下面再细说)
Trigger 触发器
Trigger 是这些任务的执行规则,JobDetail( 或 Job )代表的是具体的任务
任务什么时候开始执行,以及执行的频度和次数,都是通过 Trigger 的实例来描述的
多个触发器可以指向同一个任务,但一个触发器只能指向一个任务
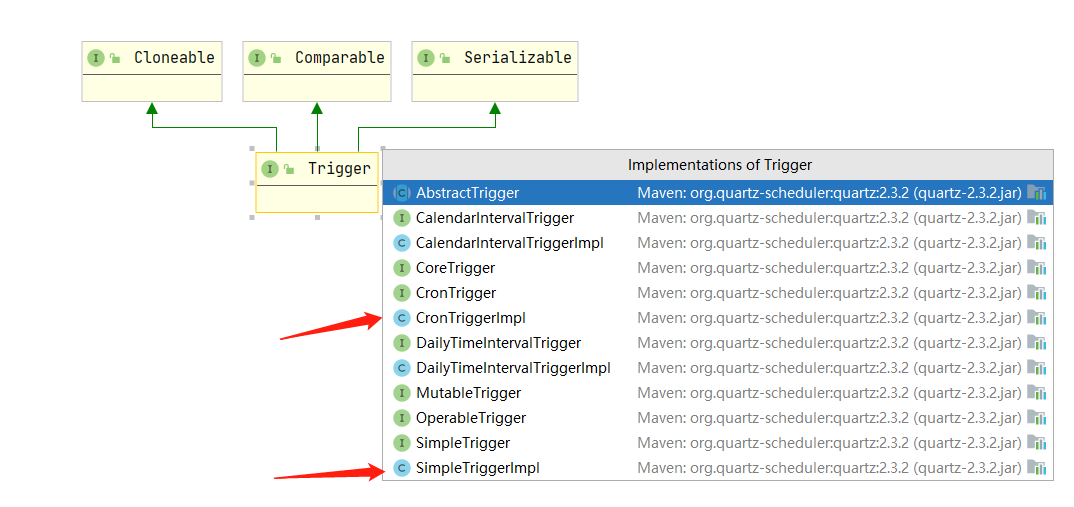
常用的两个 CronTriggerImpl、SimpleTriggerImpl
Trigger 接口主要描述了一个任务( Job )的调度优先级、开始时间、结束时间、Calendar 的名称等
此外里面还有两个比较重要的类型:JobKey 和 TriggerKey ,这两个类都是 org.quartz.utils.Key 的子类型,Key 类型中仅有的两个字段是 name 和 group 。毫无疑问,JobKey 和 Trigger 分别描述的是 Job 和 Trigger 的名称和组
SimpleTriggerImpl 主要是一些简单的执行规则 CronTriggerImpl 则更为灵活强大,能够胜任更为复杂的规则
同样,跟 JobDetail 类似,Trigger 接口的实例要通过 TriggerBuilder 来构造
1
2
3
4
5
6
7
// 构建一个Trigger,指定Trigger名称和组,规定该Job立即执行,且两秒钟重复执行一次
    SimpleTrigger trigger = TriggerBuilder.newTrigger()
            .startNow() // 执行的时机,立即执行
        .withIdentity("trigger1", "group1") // 不是必须的
            .withSchedule(SimpleScheduleBuilder.simpleSchedule()
                    .withIntervalInSeconds(2).repeatForever()).build();
    // build 之后返回的类型是 SimpleTrigger,具体的类型是 SimpleTriggerImpl
上面最重要的是 withSchedule 这个方法,它制定了任务的执行规则,这里使用到了SimpleScheduleBuilder 来构建了一个简单的任务调度规则,最终导致 build 之后的Trigger 实例属于 SimpleTrigger 类型
CronScheduleBuilder 返回的是 CronTriggerImpl 类型
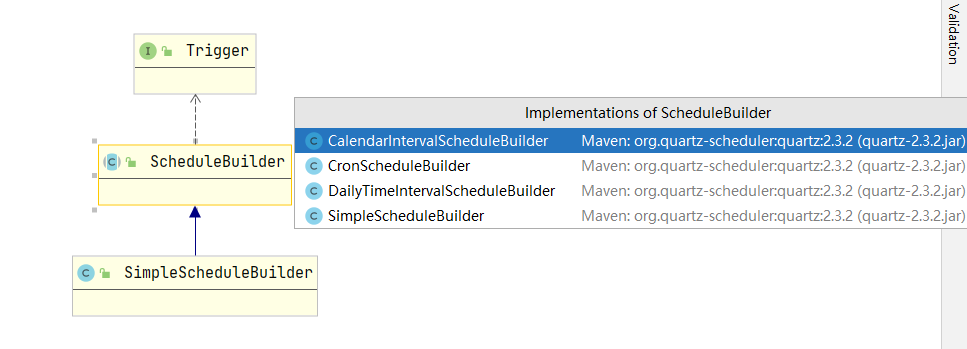
SimpleScheduleBuilder 继承结构可以看到它属于 ScheduleBuilder( abstract 修饰) 类的子类,而 ScheduleBuilder 子类的实现由上图所示
通过查看 TriggerBuilder 的代码可以知道更多属性设置:
1
2
3
4
5
6
7
8
9
10
11
public class TriggerBuilder<T extends Trigger> {
    private TriggerKey key;  // Trigger 的名称和组
    private String description;  // Trigger的描述
    private Date startTime = new Date();  // 任务开始时间,不设置默认立即开始
    private Date endTime; // 结束时间
    private int priority = Trigger.DEFAULT_PRIORITY; // 任务优先级
    private String calendarName;  // 日历名称
    private JobKey jobKey;  // Job 的名称和组
    private JobDataMap jobDataMap = new JobDataMap(); // 用于携带数据
    private ScheduleBuilder<?> scheduleBuilder = null; // 调度规则
}
创建 SimpleTrigger 的时候使用的是 SimpleSchedulerBuilder:
1
2
3
4
5
public class SimpleScheduleBuilder extends ScheduleBuilder<SimpleTrigger> {
    private long interval = 0; // 执行的时间间隔
    private int repeatCount = 0; // 任务执行的次数
    private int misfireInstruction = SimpleTrigger.MISFIRE_INSTRUCTION_SMART_POLICY; // 任务未正常执行时的处理策略
}
SimpleSchedulerBuilder使用静态方法返回实例,相关的设置方法基本都以with、repeat开头,知道了属性的含义之后调用也是很方便了
最后关于 TriggerBuilder 和 SimpleSchedulerBuilder 还有需要注意的地方:
- 重复的次数可以是 0 到 SimpleTrigger.REPEAT_INDEFINITELY
- 重复的执行间隔必须是大于等于 0 的正整数
- 如果指定了 endTim e参数,则重复执行的参数会被覆盖
JobDataMap 数据存储类
通过查看 JobDetail 、 Trigger 及 JobExecutionContext 的源码可以发现,他们中都存在 JobDataMap 这个类型,它是以 Map 的形式存储我们的一些自定义数据的。当 Job 对象的 execute 方法被调用时,JobDataMap 会通过 JobExecutionContext 传递给 execute 方法,它可以用来装载任何可序列化的数据对象。JobDataMap 实现了 Java 中的 Map 接口,提供了一些自己的方法来存储数据

JobDataMap 当 Java 中的 map 来用就行了
Scheduler 任务调度器
Scheduler 任务调度器也是一个接口,它定义了调度任务中的基本操作骨架

通过 SchedulerFactory 调度器构建工厂的接口子工厂实例来完成,它有两个具体的工厂实现

一般使用的是 StdSchedulerFactory 工厂来获取 Scheduler 实例,因为它可以使用配置文件方式配置参数
DirectSchedulerFactory 则是使用硬编码(通过调用方法)的方式来设置参数;下面先说 StdSchedulerFactory 工厂获取 Scheduler 实例的方法
1
2
// StdSchedulerFactory
Scheduler scheduler = new StdSchedulerFactory().getScheduler();
这里返回的是一个 Scheduler 类型 , StdScheduler 是 Scheduler 的子类型。所有的组件都集齐了,就可以实际来使用 Quartz 完成自定义的任务了
测试案例
创建一个 Quartz 任务,任务中从 JobExecutionContext 获取到 JobDeail 和 Trigger 中的 JobDaaMap,并从中获取到客户端 QuartzScheduler 传入的数据
1
2
3
4
5
6
7
8
9
10
11
12
13
14
15
16
17
18
public class QuartzJobImpl implements Job {

    @Override
    public void execute(JobExecutionContext context) throws JobExecutionException {
        // 业务逻辑代码
        // 获取JobDetail中的JobDataMap
        JobDataMap jobDetailDataMap = context.getJobDetail().getJobDataMap();
        // 获取Trigger中的JobDataMap
        JobDataMap triggerDataMap = context.getTrigger().getJobDataMap();
        System.out.println(jobDetailDataMap.get("message"));
        System.out.println(triggerDataMap.get("number"));

        // 获取JobDetail与Trigger合并后的JobDataMap
        //JobDataMap mergedJobDataMap = jobExecutionContext.getMergedJobDataMap();
        //log.info(mergedJobDataMap.get("message"));
        //log.info(mergedJobDataMap.get("number"));
    }
}
创建 Quartz 客户端,构建 JobDetail 和 Trigger 并使用 Scheduler 开始任务调度( 这里要注意的是 Scheduler 实例创建后处于 “待机” 状态,还需要调用 start 方法启动调度器,否则任务是不会执行 )
1
2
3
4
5
6
7
8
9
10
11
12
13
14
15
16
17
18
19
20
21
22
23
24
25
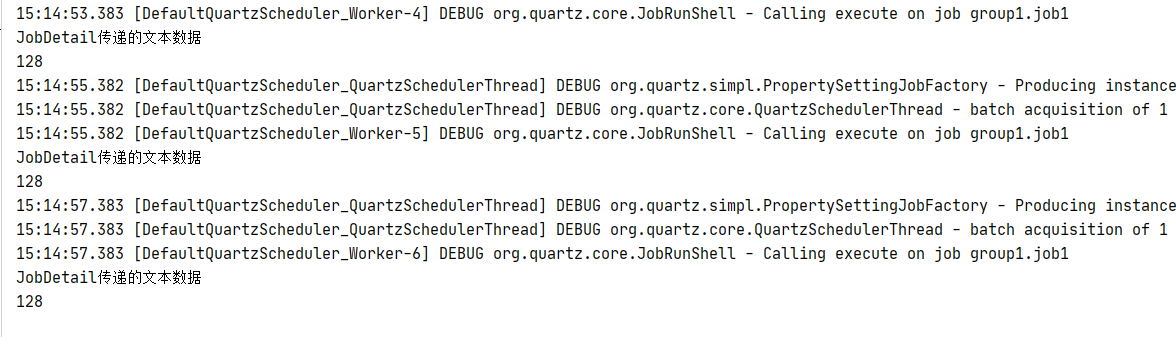
public class QuartzScheduler {
public static void main(String[] args) throws SchedulerException {
// 创建一个JobDetail实例
JobDetail jobDetail = JobBuilder.newJob(QuartzJobImpl.class)
// 指定JobDetail的名称和组名称
.withIdentity("job1", "group1")
// 使用JobDataMap存储用户数据
.usingJobData("message", "JobDetail传递的文本数据").build();
// 创建一个SimpleTrigger,规定该Job立即执行,且两秒钟重复执行一次
SimpleTrigger trigger = TriggerBuilder.newTrigger()
// 设置立即执行,并指定Trigger名称和组名称
.startNow().withIdentity("trigger1", "group1")
// 使用JobDataMap存储用户数据
.usingJobData("number", 128)
// 设置运行规则,每隔两秒执行一次,一直重复下去
.withSchedule(SimpleScheduleBuilder.simpleSchedule()
.withIntervalInSeconds(2).repeatForever()).build();
// 得到Scheduler调度器实例
Scheduler scheduler = new StdSchedulerFactory().getScheduler();
scheduler.scheduleJob(jobDetail, trigger); // 绑定JobDetail和Trigger
scheduler.start(); // 开始任务调度
}
}
JobDataMap 补充
之前 JobDataMap 数据获取的方式都是通过 jobExecutionContext 上下文
1
2
3
4
5
6
// 获取JobDetail中的JobDataMap
JobDataMap jobDetailDataMap = jobExecutionContext.getJobDetail().getJobDataMap();
// 获取Trigger中的JobDataMap
JobDataMap triggerDataMap = jobExecutionContext.getTrigger().getJobDataMap();
System.out.println(jobDetailDataMap.get("message"));
System.out.println(triggerDataMap.get("number"));
1
2
3
JobDataMap mergedJobDataMap = jobExecutionContext.getMergedJobDataMap();
log.info(mergedJobDataMap.get("message"));
log.info(mergedJobDataMap.get("number"));
还有另一种选择,那就是在 Job 的实现类中定义对应于 JobDetail 和 Trigger 中 JobDataMap 的键名的字段,并且提供对应的 setter 方法
1
2
3
4
5
6
7
8
9
10
11
12
13
14
15
16
17
18
19
20
21
22
23
24
25
26
27
public class QuartzJobImpl implements Job {
    private String message;
    private Integer number;

    public String getMessage() {
        return message;
    }

    public void setMessage(String message) {
        this.message = message;
    }

    public Integer getNumber() {
        return number;
    }

    public void setNumber(Integer number) {
        this.number = number;
    }

    @Override
    public void execute(JobExecutionContext context) throws JobExecutionException {
        // 业务逻辑代码
        System.out.println(message);
        System.out.println(number);
    }
}
CronTrigger 触发器
之前案例用的 SimpleTrigger 触发器,还有另一个使用频率很高的触发器 CronTrigger,它是基于日历( Calendar )的,不用像 SimpleTrigger 那样精确指定调度的 时间间隔 和 执行次数,而是通过 cron 表达式描述运行规则,所以要想使用 CronTrigger,需要简单了解下什么是 cron 表达式
cron表达式: 广泛应用于 Linux 和 Unix 系统中,cron 表达式被分成了 7 段,分别对应【秒】【分】【时】【日】【月】【周】【年】,每段用英文半角空格隔开,每段的编写规则如表所示:
| 字段 | 允许值 | 允许的特殊字符 |
|---|---|---|
| 秒(Seconds) | 0 ~ 59 的整数 | , - * / 四个字符 |
| 分(Minutes) | 0 ~ 59 的整数 | , - * / 四个字符 |
| 小时(Hours) | 0 ~ 23 的整数 | , - * / 四个字符 |
| 日期(DayofMonth) | 1~31的整数(需要考虑月的天数) | , - * ? / L W C 八个字符 |
| 月份(Month) | 1~12的整数或者 JAN-DEC | , - * / 四个字符 |
| 星期(DayofWeek) | 1~7的整数或者 SUN-SAT (1=SUN) | , - * ? / L C # 八个字符 |
| 年(可选,留空)(Year) | 1970~2099 | , - * / 四个字符 |
每一个域都使用数字,但还可以出现如下特殊字符
*:表示匹配该域的任意值。假如在 Minutes 域使用*, 即表示每分钟都会触发事件?:只能用在 DayofMonth 和 DayofWeek 两个域。它也匹配域的任意值,但实际不会。因为 DayofMonth 和 DayofWeek 会相互影响。例如想在每月的20日触发调度,不管20日到底是星期几,则只能使用如下写法:13 13 15 20 * ?, 其中最后一位只能用?,而不能使用,如果使用表示不管星期几都会触发,实际上并不是这样-:表示范围。例如在 Minutes 域使用 5-20 ,表示从 5 分到 20 分钟每分钟触发一次/:表示起始时间开始触发,然后每隔固定时间触发一次。例如在 Minutes 域使用 5/20 ,则意味着5分钟触发一次,而 25,45 等分别触发一次.,:表示列出枚举值。例如:在 Minutes 域使用 5,20,则意味着在 5 和 20 分每分钟触发一次L:表示最后,只能出现在 DayofWeek 和 DayofMonth 域。如果在 DayofWeek 域使用 5L , 意味着在最后的一个星期四触发W: 表示有效工作日(周一到周五),只能出现在 DayofMonth 域,系统将在离指定日期的最近的有效工作日触发事件。例如:在 DayofMonth 使用 5W,如果 5 日是星期六,则将在最近的工作日:星期五,即 4 日触发。如果 5 日是星期天,则在 6 日(周一)触发;如果 5 日在星期一到星期五中的一天,则就在 5 日触发。另外一点,W 的最近寻找不会跨过月份LW: 这两个字符可以连用,表示在某个月最后一个工作日,即最后一个星期五#: 用于确定每个月第几个星期几,只能出现在 DayofMonth 域。例如在 4#2 ,表示某月的第二个星期三
常用表达式例子:
- 0 0 2 1 * ? * 表示在每月的1日的凌晨2点调整任务
- 0 15 10 ? * MON-FRI 表示周一到周五每天上午10:15执行作业
- 0 15 10 ? 6L 2002-2006 表示2002-2006年的每个月的最后一个星期五上午10:15执行
- 0 0 10,14,16 * * ? 每天上午10点,下午2点,4点
- 0 0/30 9-17 * * ? 朝九晚五工作时间内每半小时
- 0 0 12 ? * WED 表示每个星期三中午12点
- 0 0 12 * * ? 每天中午12点触发
- 0 15 10 ? * * 每天上午10:15触发
- 0 15 10 * * ? 每天上午10:15触发
- 0 15 10 * * ? * 每天上午10:15触发
- 0 15 10 * * ? 2005 2005年的每天上午10:15触发
- 0 * 14 * * ? 在每天下午2点到下午2:59期间的每1分钟触发
- 0 0/5 14 * * ? 在每天下午2点到下午2:55期间的每5分钟触发
- 0 0/5 14,18 * * ? 在每天下午2点到2:55期间和下午6点到6:55期间的每5分钟触发
- 0 0-5 14 * * ? 在每天下午2点到下午2:05期间的每1分钟触发
- 0 10,44 14 ? 3 WED 每年三月的星期三的下午2:10和2:44触发
- 0 15 10 ? * MON-FRI 周一至周五的上午10:15触发
- 0 15 10 15 * ? 每月15日上午10:15触发
- 0 15 10 L * ? 每月最后一日的上午10:15触发
- 0 15 10 ? * 6L 每月的最后一个星期五上午10:15触发
- 0 15 10 ? * 6L 2002-2005 2002年至2005年的每月的最后一个星期五上午10:15触发
- 0 15 10 ? * 6#3 每月的第三个星期五上午10:15触发
使用 CronTrigger 触发器
Job 任务类:
1
2
3
4
5
6
7
public class QuartzJob implements Job {
    public void execute(JobExecutionContext jobExecutionContext)
            throws JobExecutionException {
        log.info("开始执行");
        // 业务逻辑
    }
}
每天凌晨 1:00 到 1:59 ,以及 2:00 到 2:59 执行,每隔两秒执行一次”,那么cron表达式应该是这样的:0/2 * 1,2 * * ?
Scheduler任务调度类:
1
2
3
4
5
6
7
8
9
10
11
12
13
14
15
16
17
18
19
20
public class QuartzScheduler {
    public static void main(String[] args) throws SchedulerException {
        // 创建一个JobDetail实例
        JobDetail jobDetail = JobBuilder.newJob(QuartzJob.class)
                // 指定JobDetail的名称和组名称
                .withIdentity("job1", "group1").build();

        // 创建一个CronTrigger,规定Job每隔一秒执行一次
        CronTrigger trigger = TriggerBuilder.newTrigger()
                // 指定Trigger名称和组名称
                .startNow().withIdentity("trigger1", "group1")
                // 设置cron运行规则,定义每秒执行一次
                .withSchedule(CronScheduleBuilder.cronSchedule("0/2 * 1,2 * * ?")).build();

        // 得到Scheduler调度器实例
        Scheduler scheduler = new StdSchedulerFactory().getScheduler();
        scheduler.scheduleJob(jobDetail, trigger); // 绑定JobDetail和Trigger
        scheduler.start();                         // 开始任务调度
    }
}
Scheduler 任务调度器补充
Scheduler 维护了一个 JobDetails 和 Triggers 的注册表。在 Scheduler 注册过后,当定时任务触发时间一到,调度程序就会负责执行预先定义的 Job
程序获取 Scheduler 应该通过工厂的方式,前面提到了 Scheduler 获取实例的两个工厂类:StdSchedulerFactory 和 DirectSchedulerFactory ,而由于 StdSchedulerFactory 使用的是配置文件的方式配置必要的参数,所以使用较DirectSchedulerFactory 硬编码的方式配置参数更为普遍,同时也更推荐使用StdSchedulerFactory
Scheduler 的主要方法(部分)
1
2
Date scheduleJob(JobDetail jobDetail, Trigger trigger)
        throws SchedulerException;
调度任务,并返回开始执行的时间
1
void start() throws SchedulerException;
调度器实例化后仍处于“待命”状态,需要 start 方法启动调度器
1
void standby() throws SchedulerException;
挂起调度器,暂停执行任务,可以恢复
1
2
void shutdown(boolean waitForJobsToComplete)
        throws SchedulerException;
关闭调度器,如果传入的参数为 true,等待所有任务完成后再关闭,否则立即关闭
1
void shutdown() throws SchedulerException;
立即关闭调度器,不等待任务正常完成
1
boolean isShutdown() throws SchedulerException;
查看调度器是否关闭了
1
void resumeAll() throws SchedulerException;
重新执行挂起的任务
StdSchedulerFactory 工厂补充
StdSchedulerFactory 通过名为 quartz.properties 文件来创建和初始化 Quartz 调度器 Scheduler,导入的 Quartz 依赖中自带了一个默认的 quartz.properties 文件,可以到项目的 External Libraries 找到 Quartz 相关的 jar 文件,在 org.quartz 包下即可看到,打开文件内容如下(注意这里键与值是通过冒号加空格的方式分割的):
1
2
3
4
5
6
7
8
9
10
11
12
13
14
15
16
17
# 调度器的配置
org.quartz.scheduler.instanceName: DefaultQuartzScheduler
org.quartz.scheduler.rmi.export: false
org.quartz.scheduler.rmi.proxy: false
org.quartz.scheduler.wrapJobExecutionInUserTransaction: false

# 线程池的配置
org.quartz.threadPool.class: org.quartz.simpl.SimpleThreadPool
org.quartz.threadPool.threadCount: 10
org.quartz.threadPool.threadPriority: 5
org.quartz.threadPool.threadsInheritContextClassLoaderOfInitializingThread: true

# misfire阈值设置
org.quartz.jobStore.misfireThreshold: 60000

# 任务存储配置
org.quartz.jobStore.class: org.quartz.simpl.RAMJobStore
以上是 Quartz 运行时的必要参数设置,Quartz 可以配置的属性远不止这些
org.quartz.scheduler.instanceName 用来设置调度器的实例名称(任意字符串)
还有一个比较重要的属性 org.quartz.scheduler.instanceId 上面没有设置,它用来设置调度器的实例 Id(任意字符串),它是全局唯一的,不能与其他调度器 Id 重名,如果不想指定,可以通过设置为 AUTO 让 Quartz 自动生成
在使用 StdSchedulerFactory 获取 Scheduler 实例的时候,Quartz 会现在工程下查找quartz.properties 配置文件,如果没有则使用它默认的
如果需要自己定义配置参数,可以在工程下(注意是工程下,跟 pom 文件是同级的)创建一个名为 quartz.properties 的文件,将上面的内容复制到新文件中,根据需求改动就可以,更多属性设置请查阅相关资料
如果想指定 properties 文件的名称和路径就需要使用到 StdSchedulerFactory 工厂实例的 initialize 方法了,有三种使用方式
1
2
3
4
5
6
7
8
9
10
11
12
13
14
15
16
17
18
19
20
public class QuartzScheduler {
    public static void main(String [] args)  throws SchedulerException {
        StdSchedulerFactory schedulerFactory = new StdSchedulerFactory();

        // 第一种方式 通过Properties创建,可以没有properties文件,直接代码设置properties属性
        Properties props = new Properties();
        props.load(new FileInputStream("config.properties"));
        schedulerFactory.initialize(props);

        // 第二种方式 直接通过文件名,properties文件放置在classpath下
        // schedulerFactory.initialize("config.properties");

        // 第三种方式 传入文件流
        // InputStream is = new FileInputStream(new File("config.properties"));
        // schedulerFactory.initialize(is);

        // 获取调度器实例
        Scheduler scheduler = schedulerFactory.getScheduler();
    }
}